
All About Error Code 0x8004010F in Outlook and Solution to Fix it
Nowadays, it is obvious that Microsoft Outlook has a long list of Errors and “0x8004010F” is one of them. The cause of this error is an improper configuration of the Outlook profile. In this case of error, users not able to send or receive the emails or messages in their Outlook, and the given below pop-up error message shown along with its numeric code.
Error Message – 0x8004010F: Outlook data file cannot be accessed
or
Error Message – 0x8004010F: The operation failed. An object could not be send
A Solution to fix the 0x8004010F error in Outlook
As we discussed this problem occurred due to the wrong setup of the profile in MS-Outlook. So, the solution to fix this error also belongs to the profile-related terms. By making some variations in Outlook’s profile settings, you can troubleshoot this bug and can synchronize to send/receive emails.
To deal with this error, the user should first recognize the current location of their Outlook PST file and set up a new profile in outlook. This complete procedure includes three most important steps:
- Locate the Outlook Data File (PST) as Default
- Make A New Outlook’s Profile
- Setup New Profile as Default Outlook Profile
Locate the Outlook Data File (PST) as Default
- Click on the “Start” button and move on to the control panel.
- Now, click on the “Mail” under the control panel.
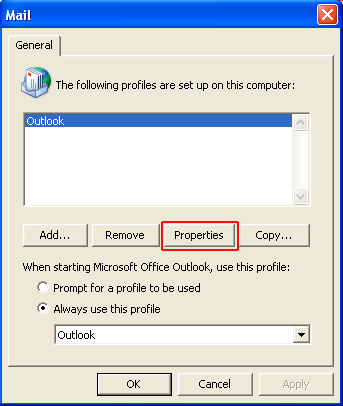
- A small pop-up window will appear on the screen in which you have to click on the “Show Profiles” option.
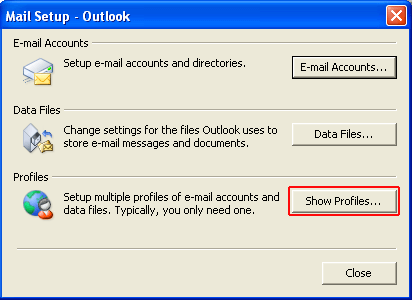
- After clicking on the Show Profile option, users will get the list of all the profiles, choose your present Outlook profile and make a click on the “Properties” button.
- In the “Mail Setup – Outlook” dialog box, choose the “Data Files” option.
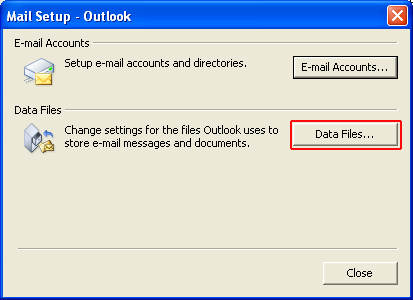
- Now a new “Account Settings” window opens on your screen, check PST data file name & current location under the “Data Files” tab.
- Finally, close on the “Finish” button.
Make A New Outlook’s Profile
In the previous step, we learned “How to Locate the Outlook Data File (PST) as Default?” But after getting knowledge about the Outlook profile next move is to create a new Outlook profile.
Microsoft permits users so they can create or set up Outlook profile by two different methods:
- Auto Account Setup
- Manually Setup of Outlook Account(profile)
Setup New Profile as Default Outlook Profile
Set up your newly created Outlook profile as the default Outlook profile. To make as default, follow the given steps:
- Under the General section of the mail dialog box, choose or select the “Always use this profile” option.
- From the drop-down menu, select the profile which you want to make as the default.
- Click on the “Ok” button.
These steps and instructions can resolve your Outlook PST-related error and allow your emails to go for send/receive action.
And in case if the above method gets fails to resolve an error “0x8004010F” then go for a technically enhanced utility like Outlook file Recovery. As it supports fixing all Outlook errors that make the database inaccessible and corrupted.
Conclusion
This blog is about Error Code 0x8004010F in Outlook. Here we have provided a pictorial step-by-step guide to fix it.
Also, Read – Outlook Error Code 8